此功能為需要購買License 權限才可以使用的功能
目前只能使用查詢條件查詢
基本資料可以看這裡
https://www.elastic.co/guide/en/watcher/current/actions.html
https://www.elastic.co/guide/en/watcher/current/watching-marvel-data.html
首先我們要先知道怎麼設定查詢的條件
這裡必須要知道怎麼去查詢elasticsearch api 的query,這裡不多說明
我們可以透過Dev Tools 去查詢資料

此查詢條件為過去十分鐘 符合上面條件的資料都會列出
會得到下面的結果

這裡只列出一些大概的資料 更詳細的部分請各位自己去查詢 他會告訴你時間以及找到的筆數
下面會列出詳細的資料
Watcher介紹
Wacher在Management 裡面可以設定

基本上按了Add以後會看到這個畫面

基礎他有分成幾塊
- trigger :代表是重複執行的時間
- input :查詢的條件
- condition : 設定什麼條件會match
- action: 要執行什麼動作
Trigger
控制觸發的時間以及遞迴的時間 https://www.elastic.co/guide/en/x-pack/current/trigger-schedule.html#specifying-times-using-objects
每十分鐘觸發
"trigger" : {
  "schedule" : { "interval" : "10m" }
}
每天五點觸發
"trigger" : {
  "schedule" : {
    "daily" : { "at" : "17:00" }
  }
}
例子請看上面網址
input 主要是你判斷條件的來源
simple: 讀取靜態內容 search: 讀取查詢語句執行後的返回結果 http: 讀取HTTP請求的返回結果 chain: 用來自由組合使用上面三種類型組成的多個input
原文網址:https://kknews.cc/zh-tw/other/89b5gzq.html
這裡我們用的是search
例子就像下面這樣 詳細語法請參考 https://www.elastic.co/guide/en/elasticsearch/reference/5.6/search.html
"input": {
    "search": {
      "request": {
        "search_type": "query_then_fetch",
        "indices": ["xxxx-aplication"],
        "types": [],
        "body": {
          "query": {
            "bool": {
              "must": [
                {
                  "match": {
                    "Method": "LOGIN"
                  }
                },
                {
                  "match": {
                    "type.keyword": "feature"
                  }
                },
                {
                  "match": {
                    "index_prefix.keyword": "xxxx-application"
                  }
                },
                {
                  "match": {
                    "module.keyword": "desktop"
                  }
                },
                {
                  "range": {
                    "@timestamp": {
                      "gte": "now-10m"
                    }
                  }
                }
              ]
            }
          }
        }
      }
    }
  }
最主要的query都在這裡請看條件是
Method = Login and type = feature , index_prefix= xxxx-application , index= xxxx-application
時間是 現在到過去十分鐘
如果不確定可以把剛剛那段往dev tools 丟看看 如上圖 就可以看到結果
我們再來看一個更進階的查詢
我們希望找到過去一小時 是中國的資料然後group by userId 產生出一個新的欄位
 "input": {
    "search": {
      "request": {
        "search_type": "query_then_fetch",
        "indices": [],
        "types": [
          "request"
        ],
        "body": {
          "query": {
            "bool": {
              "must": [
                {
                  "exists": {
                    "field": "userId.keyword"
                  }
                },
                {
                  "range": {
                    "@timestamp": {
                      "gte": "now-60m"
                    }
                  }
                },
                {
                  "match": {
                    "geoip.country_name": "China"
                  }
                }
              ]
            }
          },
          "aggs": {
            "distinct_userId": {
              "cardinality": {
                "field": "userId.keyword"
              }
            }
          }
        }
      }
    }
  }
我們可以看到這裡查詢後就多了這個欄位可以提供我們使用 接下來要判斷或是action都可以用

condition
決定之後的actions 執行的條件
判斷我們剛剛講的userId 在一小時內低於1000 就觸發
"condition": {
    "compare": {
      "ctx.payload.aggregations.distinct_userId.value": {
        "lte": 1000
      }
    }
  }
actions
如果要寄信需要設定MAIL SERVER的認證 這裡的值 參考: https://www.elastic.co/guide/en/x-pack/current/actions-email.html
這裡就可以看到寄信的內容以及LOG 的內容
"my-logging-action": {
      "logging": {
        "level": "info",
        "text": "There are {{ctx.payload.aggregations.distinct_userId.value}} documents in your index. Threshold is 1000."
      }
    },
    "send_email": {
      "email": {
        "profile": "standard",
        "to": [
          "[email protected]"
        ],
        "subject": "China Member Less than 1000 in one hour",
        "body": {
          "text": " {{ctx.payload.aggregations.distinct_userId.value}}. Threshold is 1000."
        }
      }
    }
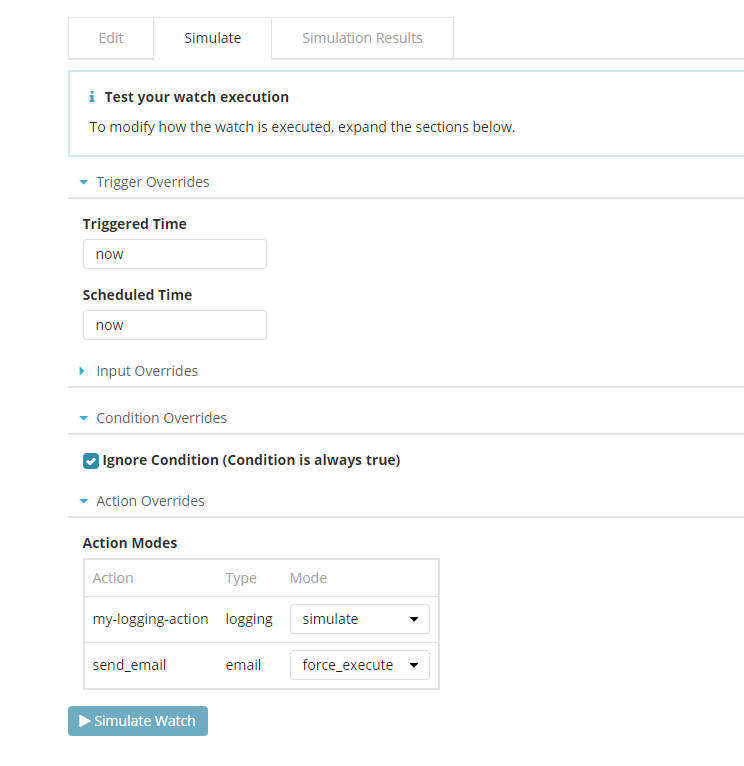
Simulate
當前面設定都設定好後可以用這個來模擬我們的結果


如果要看更多請去官方看他的設定